Looking for a super simple step-by-step guide on how to start a money-making blog in 2021? You’re in the right place.
👋In this free tutorial below, I’m going to show you step-by-step how to get website hosting and register a domain name in 15 minutes.
BONUS: By following this guide you will get FREE $100 Google Ads and Bing Ads Credit with HostGator to get your blog idea off the ground quickly 😉
Also, if you sign up with HostGator today via my discount link here, you’ll get a FREE domain for the whole year!
Get Website Hosting and Register Domain Name Now!
Starting a successful WordPress blog doesn’t have to be difficult if you follow this guide. I’m here to guide you through every step of the way. I tell you exactly where to go, what to do and where to click [with screenshots].
You can follow my instructions even if you have ZERO technical skills.
… and in about 15 minutes from now, you’ll have a professional-looking blog you can call your own and be proud of.
Click Here To Jump Straight To Tutorial!
👋 To make it easier, I’ve divided this guide into 5 concise sections that’ll walk you through the process of starting a blog today.
ƒEach of these 5 steps in the blog starting checklist below is clickable and will take you immediately to that section of this guide [so you can skip the sections that don’t apply to you].
STEP 1: Decide what to start a blog about (your niche)
STEP 3: Get website hosting and register domain name
STEP 4: Choose a blogging platform (WordPress)
STEP 5: Design and customize your WordPress blog
STEP 1: Decide what to start a blog about
First of all – congratulations on taking the first steps to become a blogger.
You probably already have a general idea of what to blog about, but let’s look at a few blogging tips for beginners just in case you are not quite there yet.
If you’re not quite sure what to blog about, ask yourself the following 4 points:
Are you passionate about your blog niche?
If you want to become a successful blogger, you need to care about the topic you are covering.
Because if you don’t, it’ll show in your writing.
You don’t have to necessarily be passionate about it right from the beginning, but you should at least be curious to learn about it as you go.
If you don’t enjoy learning about your blogging topic, you’ll run out of ideas and give up too soon.
Therefore, picking a niche you can keep up with and stay excited about is essential to growing a successful blog.
Click Here To Claim 70% Off HostGator Today!
Avoid choosing too broad of a blog niche
A niche is more than just a topic. A niche is a topic within a topic. It makes your blog stand out.
If you’re thinking of starting a fitness blog, ask yourself what particular thing about fitness excites you the most. Maybe it’s running or resistance training or yoga?
So instead of starting a fitness blog, you’ll have a yoga blog, as an example.
If you want to start a travel blog, your niche may be “backpacking” or “solo travel” or “luxury travel”.
It makes it easier to build engaged fans if your blog is aimed specifically at a particular audience and not just everyone.
The problem with too generic blogs is that when you write to everyone, you’re writing to no one.
Don’t worry about the competition
Once you pick your niche, you’ll probably think:
“But other people have already blogged about it!”
Truth is, there is no such thing as a truly ‘unique idea’.
Your experience makes it unique. You have a distinct voice. And, you probably have a vibrant personality and interesting points of view.
So don’t be afraid if someone else has already written about this niche.
They can never write it from the same place that you can. And that’s a competitive advantage for you when learning how to start a blog.
BTW: HostGator is offering new bloggers FREE $100 Google Ads and Bing Ads credit when they sign up with their hosting so you can get ahead of your competitors right away. Click on the button below to not miss out on this offer!
Get $100 FREE Ads Credit From HostGator Today!
Don’t sweat the detail
One of the biggest mistakes newbie bloggers make is trying to get their blog to look good from the beginning.
Perfectionism is what is holding many of us back from starting a blog in the first place.
Don’t stress yourself out with these minor details.
People don’t read blogs because they look nice. People read blogs because they care about the topic.
STEP 2: Choose your blog name
Choosing a name for your blog is the most fun part of the blog setup process.
Your blog name is your brand. Your blog name is also the first thing people see when you show up in search results and can often tell them what your blog is about right away.
When coming up with a blog name, don’t overthink it, don’t try to be too clever.
It doesn’t have to be complicated. In fact, it’s better if it’s not. As a blogger you want your blog to be instantly understandable and familiar because it makes it easier for people to remember it.
For example, if you want to start a blog about hiking and you live in the state of California… a name you might consider for your blog could be letshikecalifornia.com or hikeincalifornia.com.
The key is to take action and gain momentum. Don’t delay setting up a blog just because you haven’t figured out your blog name. A website hosting platform Hostgator lets you do it later.
If you’re still unsure of what should your blog name be, let’s run through a few fun exercises to help you pick a name while you’re learning how to start a blog.
Research other blogs in your niche
Type in “your niche + blogs” into Google and check how your competitors’ names and brands themselves.
Is there a special word or combination of words that seem to be popular with your niche? Are people playful or matter-of-fact?
Is there is anything you can learn from, copy or improve?
Just as an example, here is the list of some of my favorite blog names in side hustles/slasher career niche:
- Side Hustle Nation (I love it because it sounds like a big thing, a movement – which it is)
- Side Hustle School (both examples have the word ‘side hustle’ in them, which is great as it’s immediately clear what a blog is about. ‘School’ shows that the blog is going to teach me how to start a side hustle)
- Unemployable (I love its unapologetic ‘fuck-the-society’ vibe)
- Life Without Pants (This will definitely make you want to click)
- Budgets Are Sexy (Aren’t you curious?)
- Millennial Money (‘millennial’ is now a buzzword and it’s instantly recognizable. The word can be used to refer to ‘next generation’, ‘innovative’, ‘next level/better’, ‘modern’ etc.)
Once you’ve researched your competition, you need to create a big list of all the words and combinations you like and highlight your current favorites.
Sleep on it and see if today’s favorites are still your favorites tomorrow [sometimes my choices are based on my particular mood, so I always ‘sleep on it’ before locking it down].
Once you’ve gone through the brainstorming phase you’ll probably have a ton of options to choose from.
STEP 3: Get website hosting and register domain name
There are two things you need to create a blog – a domain & hosting.
In this tutorial section, I’m going to show you step-by-step how to get website hosting and register a domain name in 15 minutes.
Click Here to Jump Straight To the Tutorial!
There are tons of web hosting providers available and on the surface, they all seem to offer similar services (hosting + domain) at a similar price range.
However, there are credible players with millions of hosted websites globally and a long track record of success and there are those, that just aren’t reliable.
HostGator is one of the most trusted and reliable website hosts that hosts 9 million websites globally – you can trust it 100%.
HostGator is one of the best options for hosting smaller blogs and businesses, which makes it the best choice for beginners like you.
It is cheap, easy to set-up, and has excellent performance and speed.
Click Here to Claim 70% Off at HostGator Today!
I have used HostGator for some time and here’s why I love them more than other web hosting providers:
-
HostGator is very user-friendly for beginners
HostGator is made for beginner bloggers like you. HostGator makes it very easy to create a WordPress blog or online shop with just a few simple clicks. Their site is full of tutorials, walkthroughs and a live chat is available 24/7.
-
HostGator has the lowest price
If you care about your pennies, then stick with HostGator. With HostGator you’ll pay $2.75/month. HostGator is your go-to website host if you’re just starting your website and want to find success on a budget.
The cost of good web hosting is usually somewhere between $10-15 per month, but you will get over 60% OFF by clicking on this link.
-
HostGator guarantees you a 99.9% uptime
99.9% uptime means that your website is never down and is always accessible. HostGator is so confident in their promise, that they will give you 1 month of hosting credit if they fail to meet this 99.9% guarantee.
-
HostGator gives you a 45-day money-back guarantee
HostGator offers a longer money-back guarantee (45 days instead of the usual 30 days). HostGator is so confident you’ll love their service that they’ll give you more time to decide whether they are the best service for you.
-
HostGator support is available any time (24/7/365)
If you have any questions about your website or hosting, you can contact HostGator friendly support at any time and you’ll get your problem fixed quickly. These guys have gone above and beyond to help me (which was fantastic when I just started blogging).
-
HostGator offers a free SSL certificate
Unlike many other web hosting companies, HostGator don’t charge for SSL certificate. SSL encrypted site will look secure to your readers.
Below is the example of a secure and unsecured website:
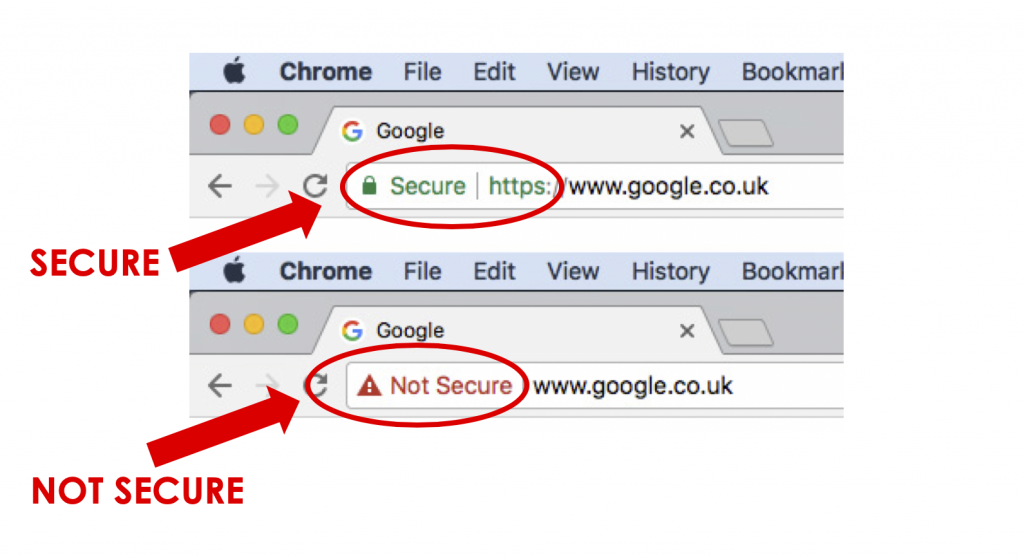 Basically, with HostGator, your website will look legit from Day 1.
Get over 60% Off Hostgator Today!
#1 Go to HostGator site
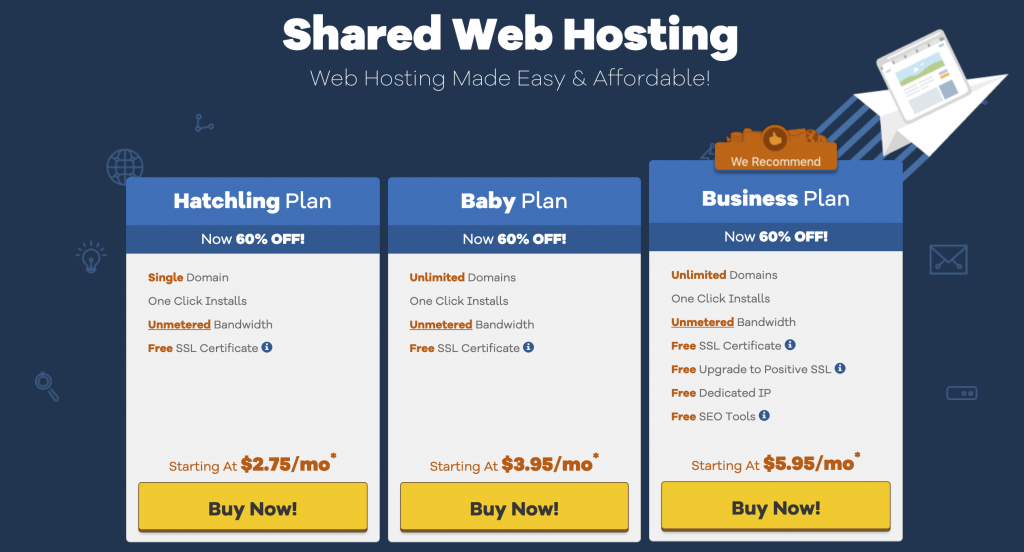
When you land on that page, you’ll have 3 hosting options:
Hatchling Plan, Baby Plan, and Business Plan.
#2: Choose your plan
If you’re starting your first blog, a portfolio site, or small business pick Hatchling Plan and click yellow “Buy Now!” Button (see image above).
As a beginner, there is no need to over-commit, so sign-up for the lowest-priced package you can. Remember, you can always upgrade later.
Pick a Baby Plan or Business Plan if you’re starting a bigger business and you need to run more than one site.
#3: Register your domain name
Once you picked your hosting plan, you’ll have 2 options:
REGISTER A NEW DOMAIN and ALREADY OWN THIS DOMAIN
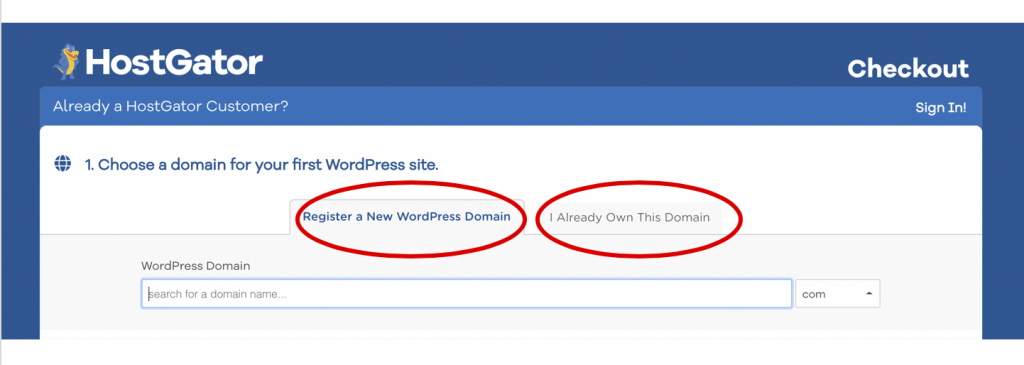 I will now guide you through both options below. It’s super easy!
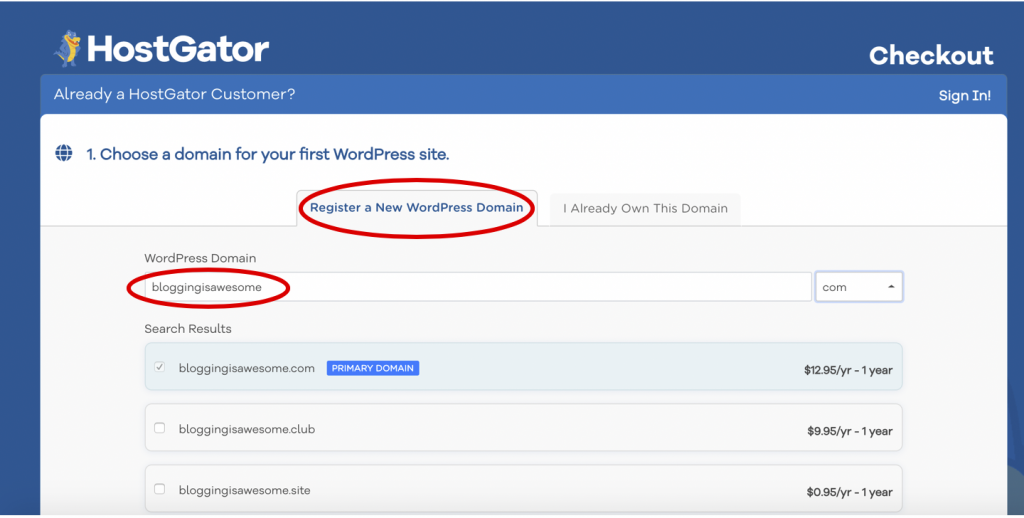
If you don’t own a domain, select REGISTER A NEW DOMAIN and type the domain name you want for your website.
HostGator is currently running a campaign where they offer FREE domain registration for your first year! for a limited time only. So Hurry!
As an example, I typed in “bloggingisawesome”, hit ENTER and I can see that it is available:
If your domain is available, it will be automatically ticked and you can claim it when you check-out. Voila!
Now scroll down until you see ”Choose a Hosting Plan”.
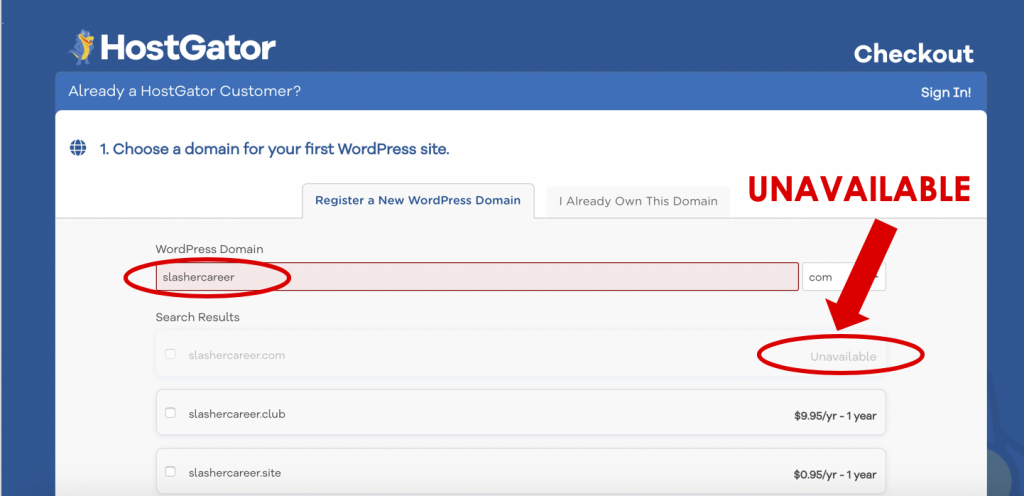
If the domain you like is already taken, it will tell you that it is unavailable.
To give you an example, I typed in my own website “slashercareer” and you can see it’s “Unavailable” [because I already own it – ha]
If your favorite domain isn’t available, you need to type in something different.
If you feel like you run out of ideas, don’t worry, you can still create a WordPress blog with HostGator and register a name later.
[Don’t procrastinate with starting a blog just because you haven’t figured out a domain name yet. You can just do it later.]
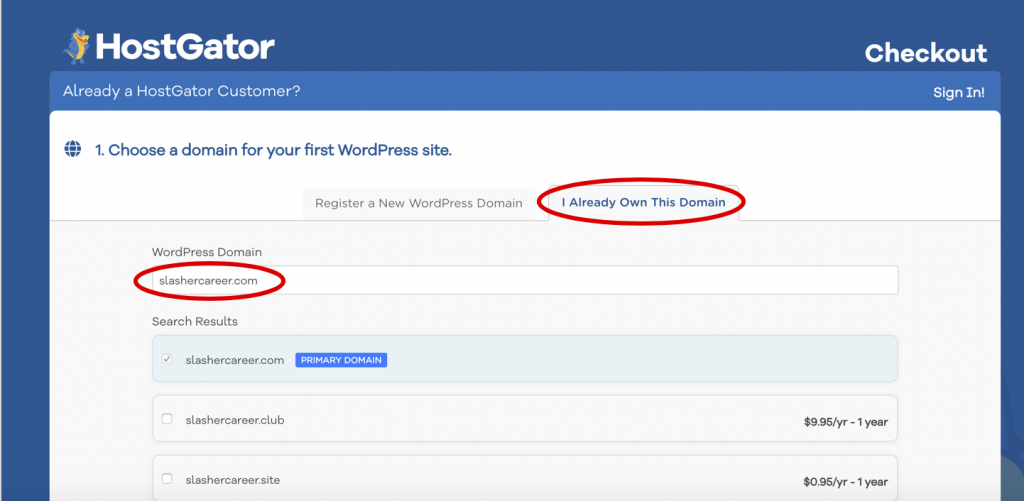
If you already own a domain, then click on I ALREADY OWN THIS DOMAIN and enter your domain. Since I already own Slashercareer, I typed it in below:
Your domain will be automatically ticked as “Primary domain” and you don’t need to do anything.
Now scroll down until you see “Choose a Hosting Plan”.
#4: Choose a hosting plan
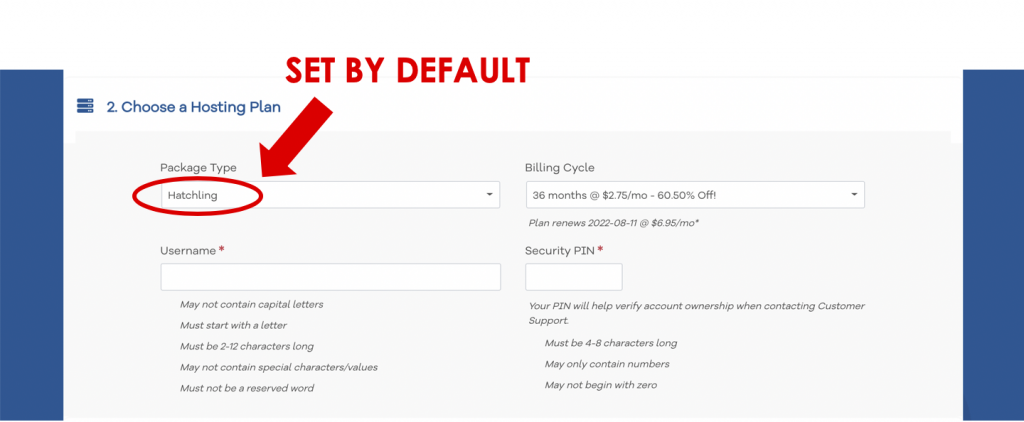
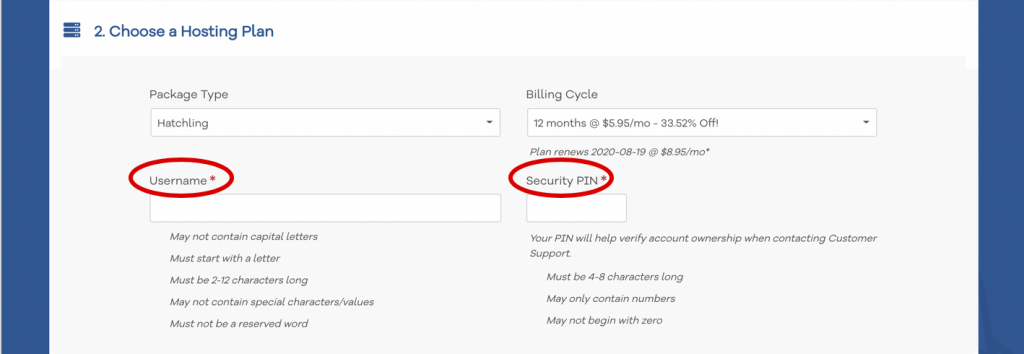
This is where you choose your hosting plan and billing cycle.
Since you already picked your plan at the beginning (either Hatching, Baby, or Business plan), you will see your choice is set by default:
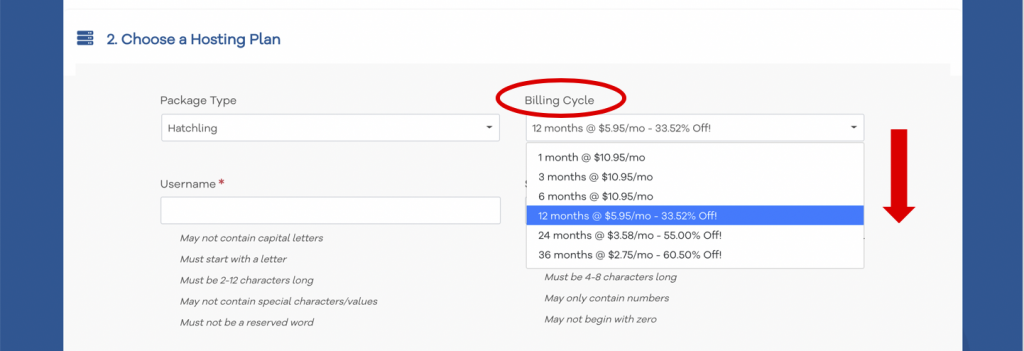
Now, pick a duration for your hosting. You can choose from a 1-36 month plan.
Click on a drop-down menu under the Billing Cycle and select your most suitable plan:
I went with a 12-month plan, but it’s up to you.
You’ll pay less the longer is your plan.
Then pick a Username. You will need it to log in to your HostGator Portal. It can be anything from “your name and surname” or “your blog name”.
Then pick your Security PIN. This needs to be 4-8 character long and must contain numbers only. You’ll need it when speaking to support and requesting any changes/troubleshooting your account. They use this code to verify your account ownership.
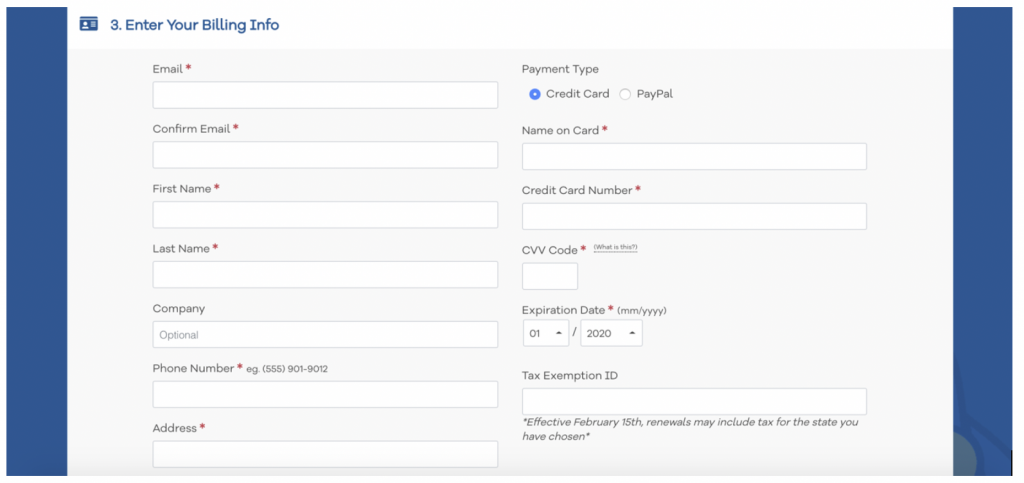
#5: Enter your billing info
You’re almost done!
Now you’ll input your billing information here:
Then scroll down until you see “Add Additional Services”
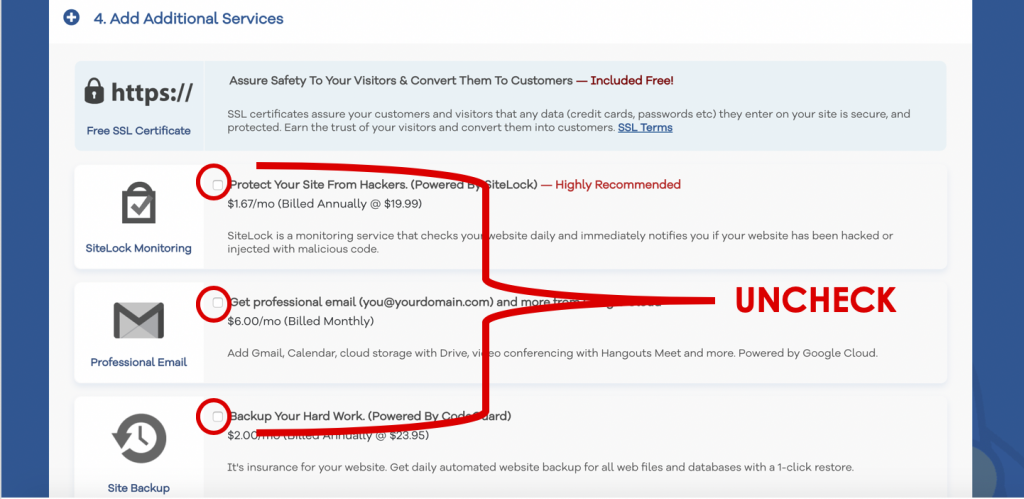
#6: Add Additional Services (OPTIONAL)
You’ll now have an option to select additional services.
Uncheck all the boxes for time being as you probably want to keep your costs down. You can always add them in later through the live chat.
FREE BONUS! HostGator gives you the SSL certification for free, which will make your site look legit and secure from day 1.
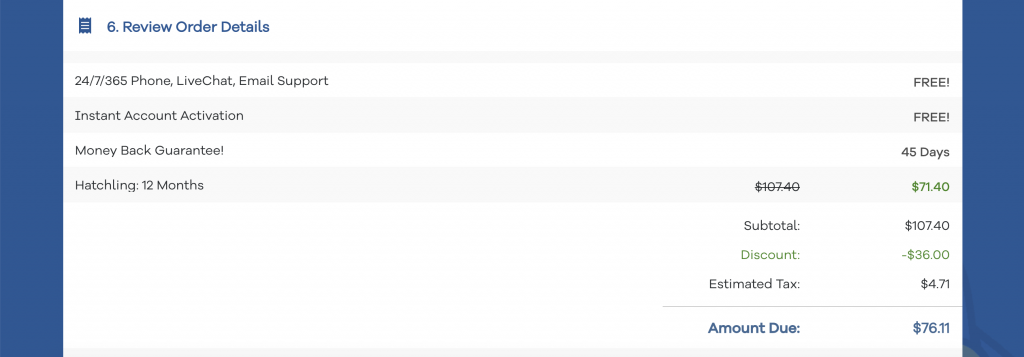
#7: Review Order Details and CHECKOUT
Make sure your order details are correct:
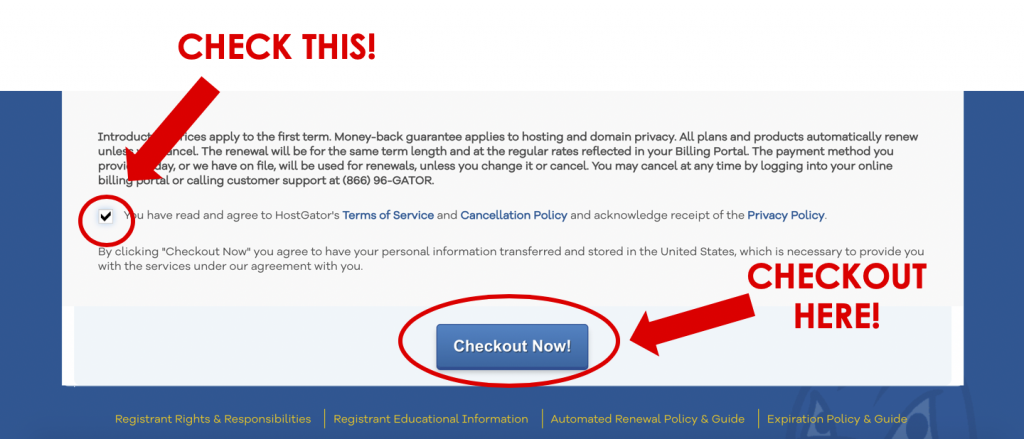
And finally, check the box that you agree to HostGator’s Terms of Service and then hit the “CHECKOUT NOW” button at the end of the page.
Woo – and you’re done!
You’ve officially completed the first major step of how to start a blog.
STEP 4: Choose a blogging platform (WordPress)
Congratulations! You own your own website!
Now it’s time to get your blog up and running.
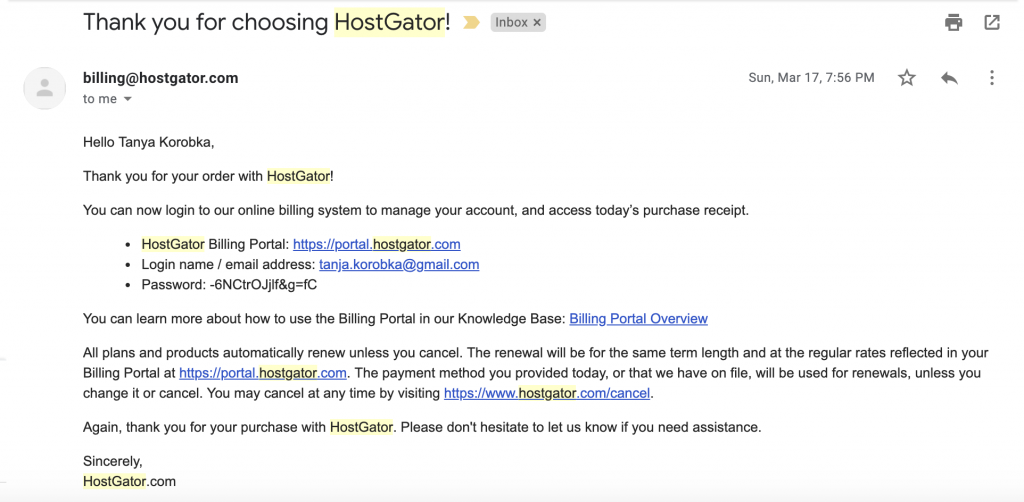
In the HostGator confirmation email, you will find a link to HostGator Portal (also known as cPanel)
Click on the portal link and sign in with your username and password, which are provided in the email.
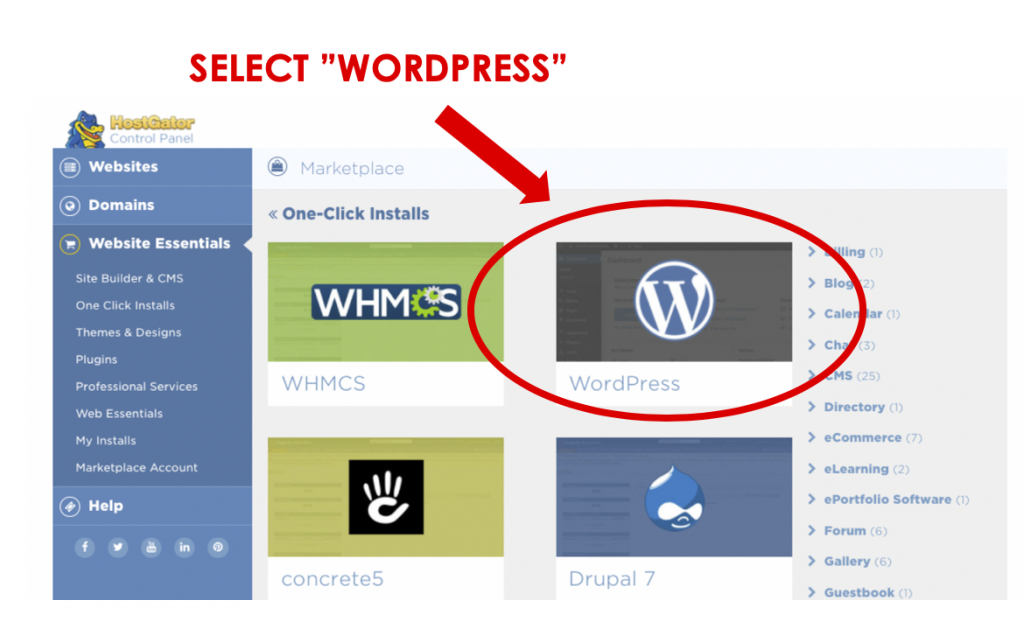
#1 Once you signed in to HostGator Portal, click on the QuickInstall icon
 #2 When you are on the QuickInstall page, select “WordPress”
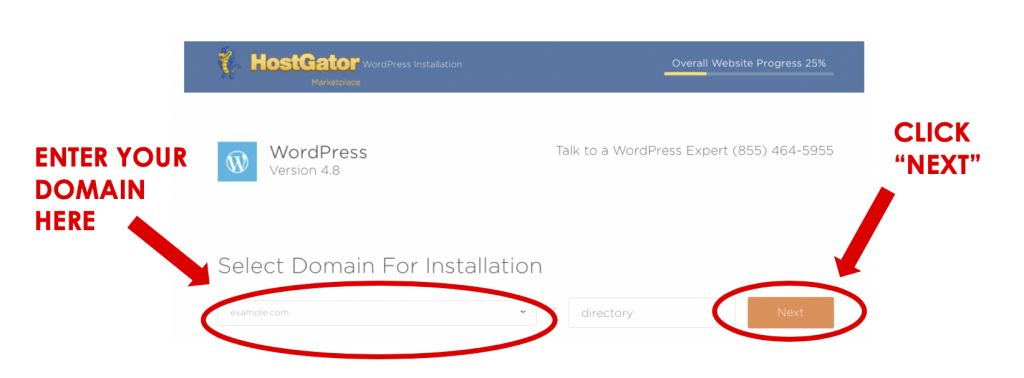
#3 Then enter your domain and click “Next”

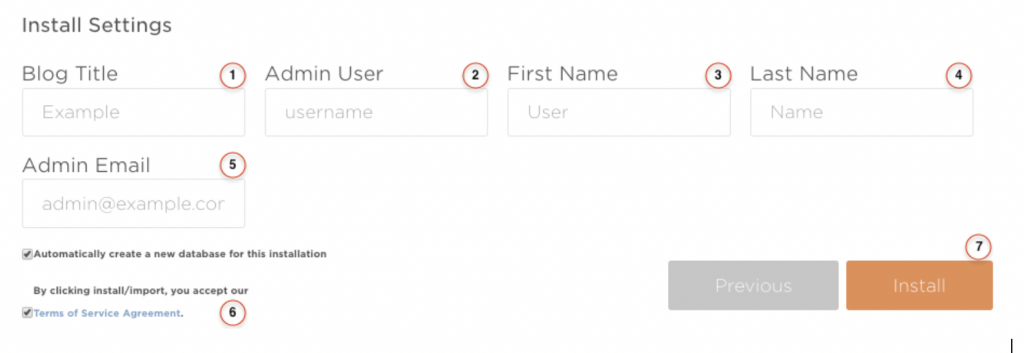
#4 Finally, fill out the form below
Complete the form that appears with the following details:
- For Blog Title, enter the name of the website. This is what will appear in the header as the name of your site.
- For Admin Username, enter your preferred username (make sure that you don’t use “admin” as username, as this is a security risk. Rather use your email address or your nickname)
- The first name is your first name
- The last name is your surname
- For Admin Email, enter an email address where you want the admin password emailed to. Make sure this is a working email address.
- Check the box next to the Terms of Service Agreement.
- Click the orange Install button when you’re ready to proceed.
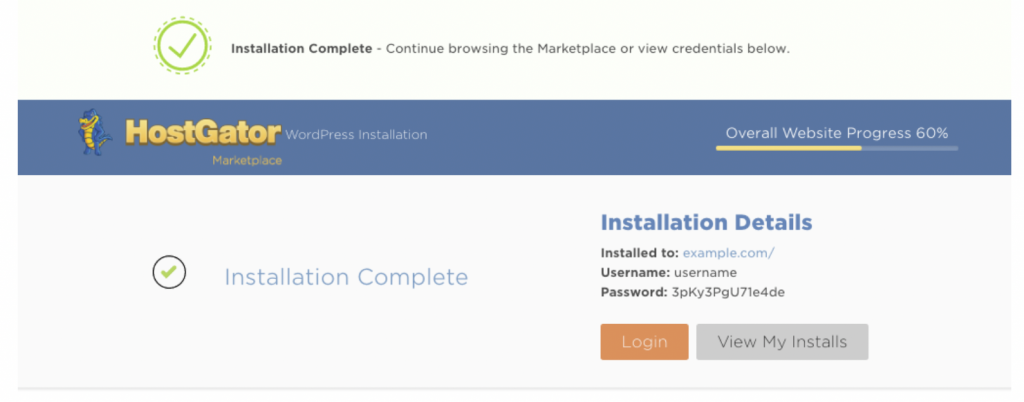
A progress bar will inform you of the progress of your installation.
Once the installation is complete, and you have your credentials (your admin URL, username, and password) and you can begin working on your WordPress site!
Check your email for the confirmation email from WordPress. There you’ll find your username, password as well as a link to your WordPress login page.
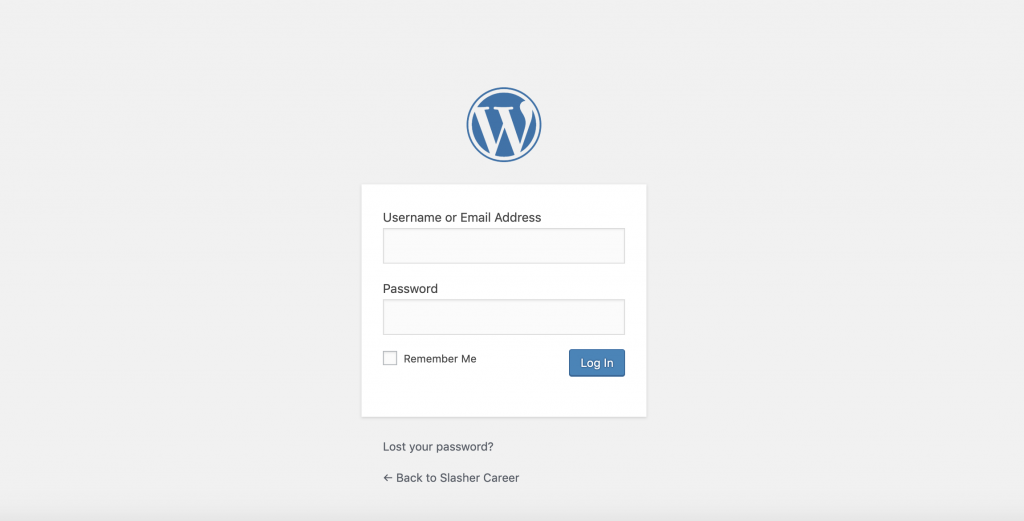
Your WordPress login page will look something like this:
yourdomain.com/wp-admin
Your username will be the one that you set for yourself. Your password will be given in the email, which you can change once you log in.
Congratulations! You have now successfully purchased your own domain and are up and running with WordPress.
STEP 5: Design and customize your WordPress blog
You are now ready to start using and customizing your WordPress blog. I promise – it’ll be easy and fun at the same time.
You can log in to your blog by typing yourblogname.com/wp-admin into your internet browser.
You are going to see this:
Now, type in your username and password. You can find them in the WordPress welcome email that was sent to you.
You log into WordPress when you want to manage the look and feel of the site, upload a blog post or tinker with the existing content.
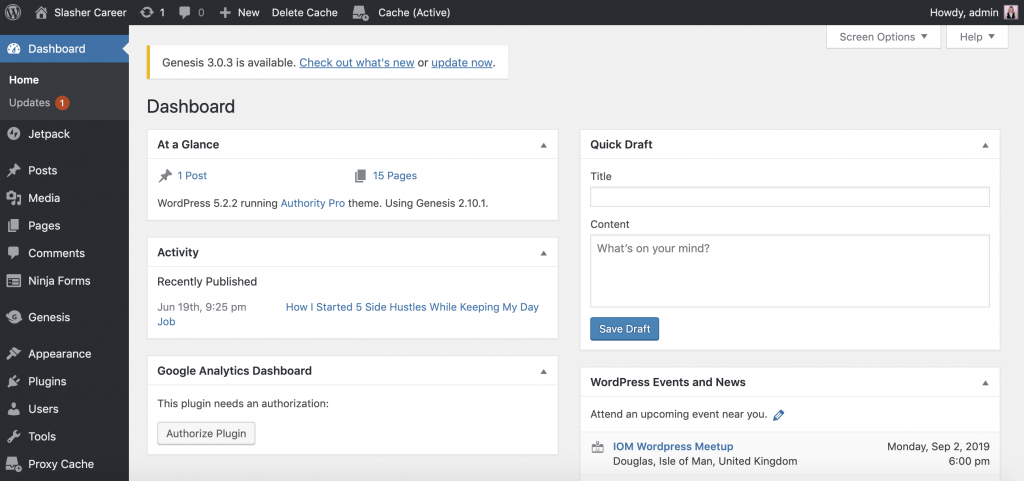
Here’s how your WordPress dashboard will look:
I recommend spending some time familiarizing yourself with the backend of your blog.
Explore, read tutorials, test things out. You’ll develop a much deeper understanding of how WordPress works and which things you can quickly change about your site’s appearance.
How to install a WordPress theme you love?
WordPress theme is a design template. A WordPress theme changes the design of your website, often including its layout.
WordPress has over 2000 professionally designed, fully-customizable, and free themes to choose from – so you’ve got a lot of options without having to pay for anything.
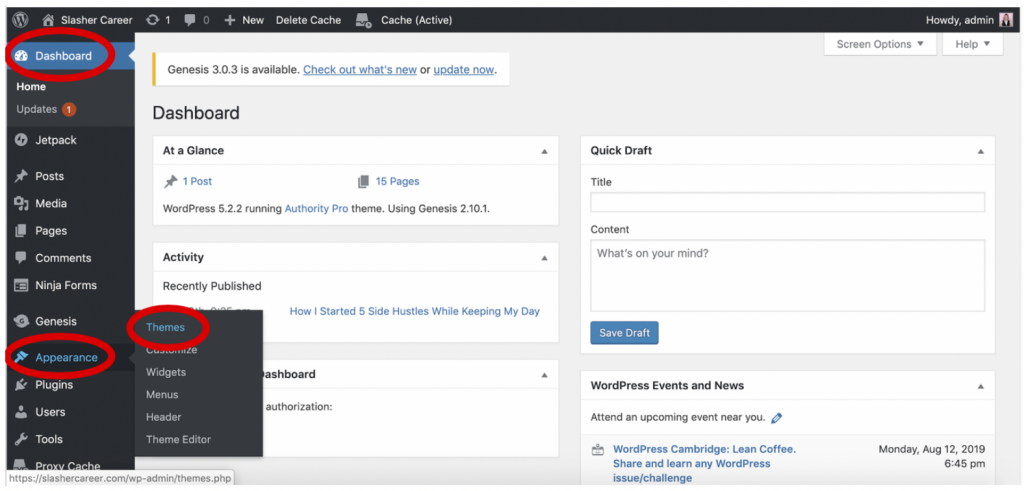
You can check them out by going here:
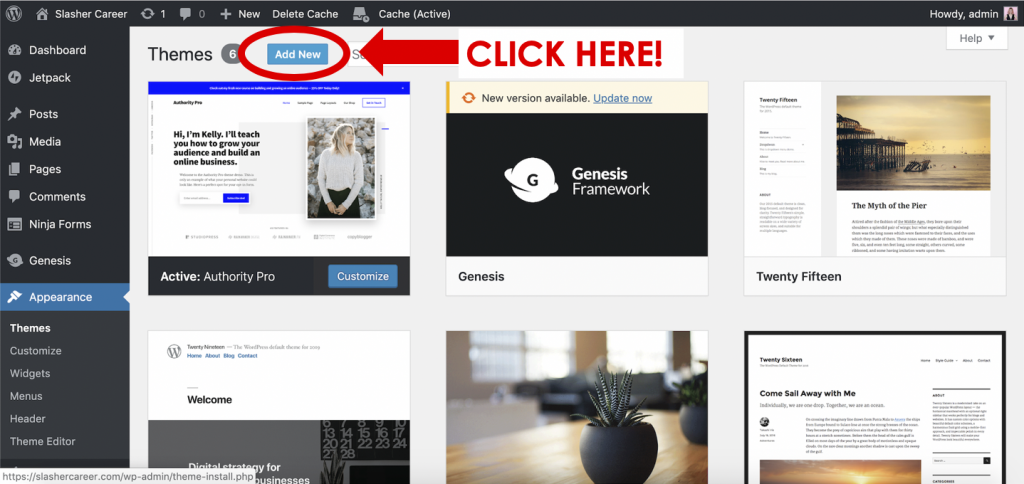
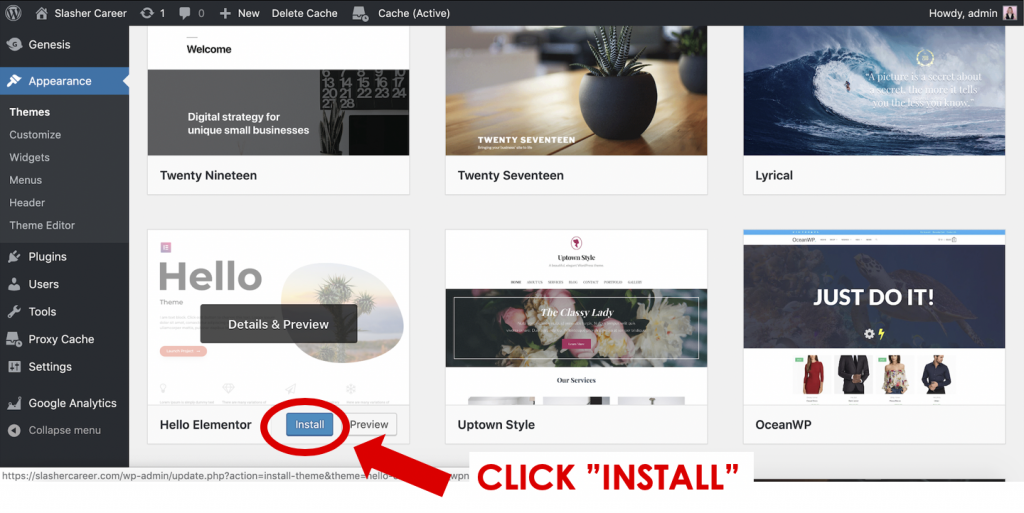
WordPress dashboard >> Appearance>> Themes
Then click on “Add New”.
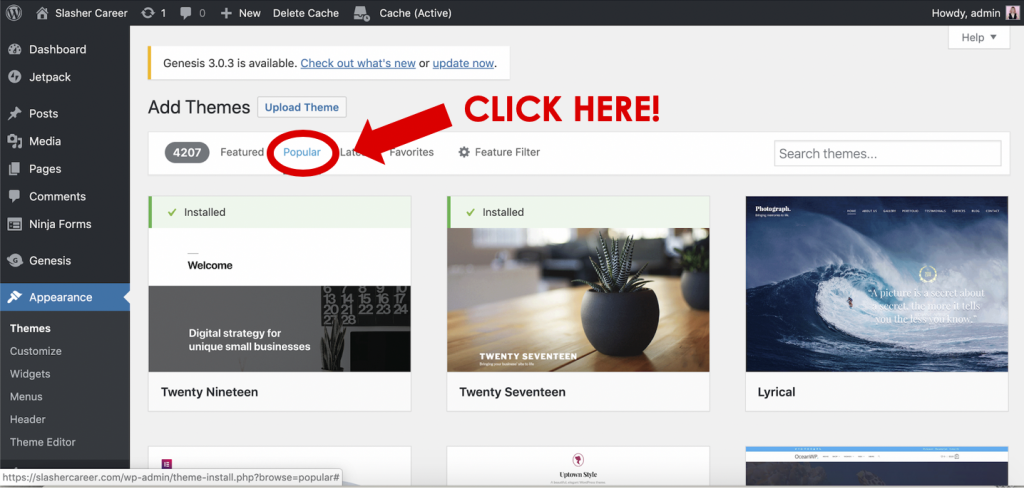
And select “Popular”.
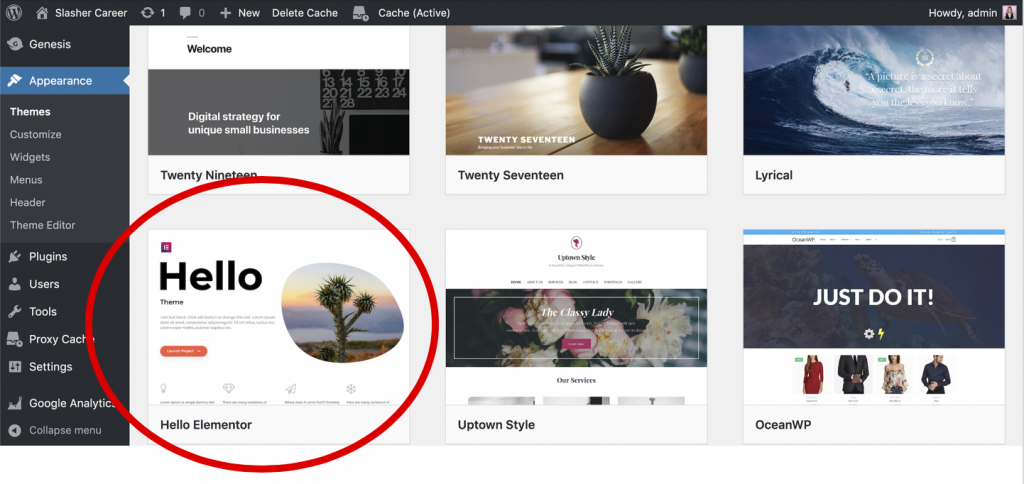
You will now have dozens of the most popular free WordPress themes to choose from.
My favorite is Hello Elementor (you will see it when you scroll down) I love it because it’s free, clean, simple, and will get you to a good starting point without needing to invest in other paid themes.
Once you selected your favorite theme, select it on click “Install”.
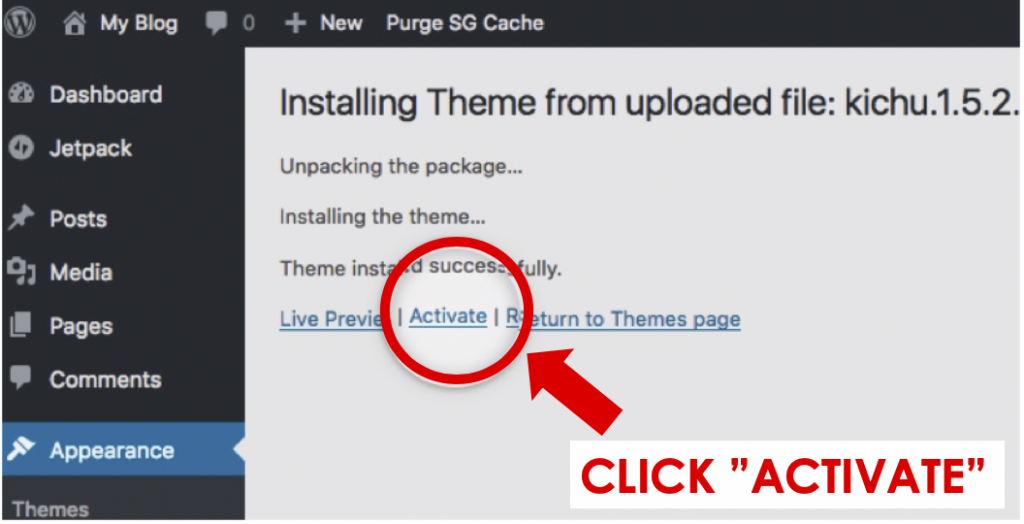
.. and once it’s installed click “Activate” and you’re done!
How to make your URLs search engine friendly?
Making your links search engine friendly is super simple and quick. You can do it immediately to make your blog more search engine friendly.
You need to get rid of and clumsy article URLs like:
yourblog.com/2012/04/topic-a/author-Tanya/how-to-start-a-blog.
A much better way is to use: yourblog.com/how-to-start-a-blog
See the difference? One is filled with irrelevant information and the other one is short, clean, neat, and contains the theme of our article which in this case is “how to start a blog“.
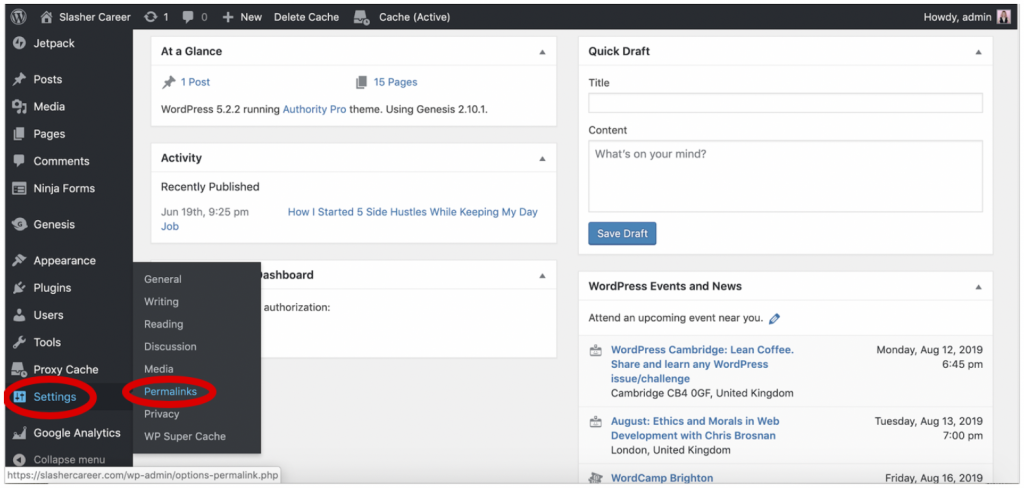
In order to change your links to be cleaner, go to your WordPress dashboard, click on the Dashboard >>Settings >> Permalinks
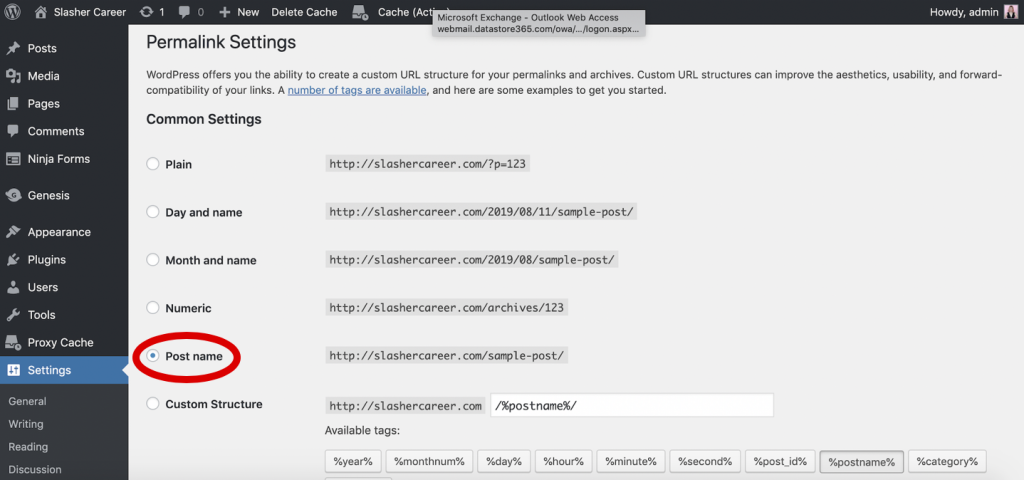
… and check “Post name” as below:
How to prevent spam comments?
I’d recommend doing this right away as well.
When you start blogging, lots of people want to leave automated spam comments under your articles. They do that for a couple of reasons – to get people from your blog to their blog and to advertise their services/products.
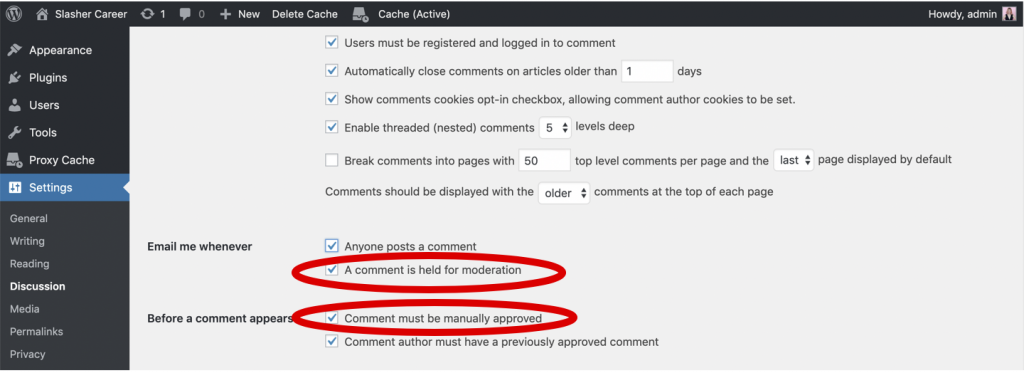
To avoid that, make sure you moderate your comments. Here’s how to do that:
Go to Dashboard >> Settings >> Discussion and check “Comments must be manually approved” and “A comment is held for moderation”.
I hope you found this guide useful.
In the next guides, I’m going to show you:
What to Blog About: 3 Myths About Money-Making Blogging Niches
7 Fastest Ways To Get 1000+ People to Your New Blog [UNBEATABLE STRATEGIES]
How to Get Consistent SEO Traffic to Your Blog [That Compounds Over Time!]
![[2023] How to Start a Successful Blog & Make Money (Step-by-Step Guide)](https://slashercareer.com/wp-content/uploads/2020/01/how-to-start-a-blog-2020-940x385.png)

Leave a Reply